 Programming in
Visual Basic
Sharing Data :
All the data we have used
so far has been conveniently contained
within controls on a form. This has meant
that we can use the name of the control
(txtQuantity, txtPrice, txtTotal, etc.)
to refer to the data that is contained
within those controls.
There are often times when we need to use
variables data that is not contained in a
control. Typical examples would be - to
move data from one control to another, to
move data from one form to another, as a
temporary store during calculations and
holding information for decision making.
To allow data to be shared between
controls within a for, we declare the
name of the data (and usually its data
type) in the General Declarations section
of the form's code. The general format of
the declaration is
Dim data name as data type
For example:
|
Dim OldPrice As
Integer
|
defines a new variable (data
that can be changed troughout the
program) called OldPrice that can
only hold integer (whole number)
values.
|
|
Dim Student As String
|
defines a new variable called
Student that will hold text
strings.
|
Const VATRate = 17.5 defines a data item
called VARRate which always has the value
17.5
Check Boxes :
Check Boxes only have two
values 0 or 1, depending wether they are
unchecked or checked. We can clear a
check box by setting a-its value to 0
(e.g. chkAnswer1 = 0). We can also
examine whether or not a check box has
been checked or not. For Example:
If chkAnswer1 = 1 Then
MsgBox
("Correct answer")
Else
MsgBox("Wrong
answer")
End If
Task Nine :

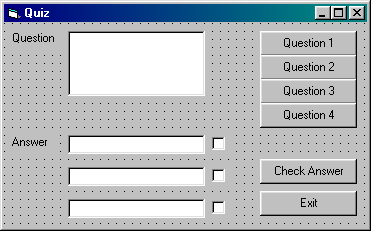
1. Open the Quiz project,
re-arrange and add controls so that it is
similar to the above.
2. Double click anywhere on the form,
avoiding the form's controls to bring up
the form's code. Choose (general) from
the Object list at the top of the form's
code and (declarations) from the Proc
list. Enter:
Dim QuestionNumber As
Integer

This sets up a variable
to hold the number of the questions we
choose which we will need to know when
checking which answer has been chosen.
3. As each question is
chosen, we need to ensure that the check
boxes are cleared and that the
QuestionNumber variable is set to the
correct value. Edit the code for the
Question 1 command button as follows:
chkAnswer1 = 0
chkAnswer2 = 0
chkAnswer3 = 0
QuestionNumber = 1
txtQuestion = "What do you call a
small pice of silicon which has a number
of electronic circuits fabricated on
it?"
txtAnswer1 = "byte"
txtAnswer2 = "chip"
txtAnswer3 = "port"
4. Edit the code for the Question 2,
Question 3 and Question 4 command buttons
similarly.
5. We need to write the code for the
Check Answer command button. Generally,
the message given to the user depends on
the Question Number and which Check Box
has been chosen. We can use a select Case
structure for the question number and an
If ... Else ... End If structure for
checking the answer given. For question
numbers 1 and 2 (Case 1, 2) the second
answer (chkAnswer2) is correct, for
Question 3 (Case 3) the first answer is
correct (chkAnswer1) and for question 4
(Case 4) the third answer is correct
(chkAnswer3). Doube click on the Check
Answer command button and enter the
following code
Select Case QuestionNumber
Case 1,2
If chkAnswer2 = 1
Then
MsgBox ("Well
done, that is correct")
Else
MsgBox ("I'm
afraid that is the wrong answer")
End If
6. Enter the code for Case 3 and Case 4,
the End Select statement and statements
to clear the check boxes after the Select
Case structure.
7. Save the project, start the program
and test all options to see if your code
works.
Exercise Nine :
1. Open the Stock project
and add two check boxes labeled VAT and
no VAT.
2. Edit the coding of the Calculate
command button to see whether or not VAT
is payable and carry out the appropriate
calculation.
3. Open the Address project and add two
check boxes labeled First Name and
Surname.
4. Edit the coding for the Find Name
command button to make it look for the
first or last name of the person entered,
dependent on the check boxes, and enter
the relevant details. (Make up some first
names of your own).
Page [<<
PREV] 1 2
3 4
5 6 [NEXT
>>]
Back to Tutorials
- Main
|