 Programming in
Visual Basic
The
Basics:
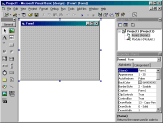
Click on the picture to
see a larger version
The above
shows a typical opening screen for a
Visual Basic project. The screen above
shows the toolbox, which is used to
design forms, a blank form, and the
project details window. A Visual Basic
project consists of a number of forms,
modules and custom controls. Your initial
screen may be different depending on
which non-standard controls are loaded.
Forms are the main part of the project,
used to design windows that serve as an
interface to your program. Forms are used
to display such things as labels,
instructions, graphics and controls as
well as allowing data entry for your
program.
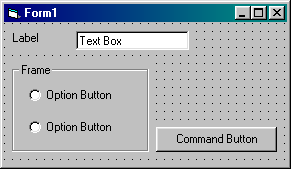
Controls are objects such as boxes,
buttons, and labels that are drawn on a
form to get data input or to display
output.
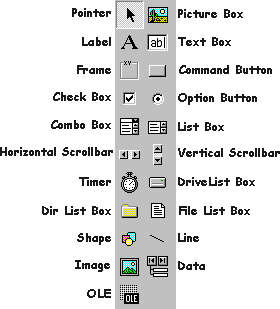
The
Toolbox displays all the standard Visual
Basic controls plus any custom controls
you may have added to your project.
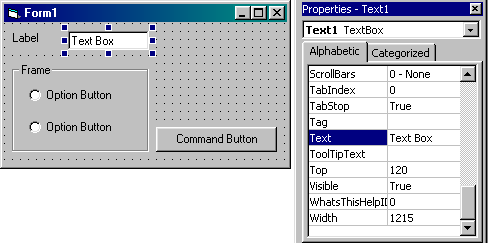
You set
the properties of forms and controls
using the properties window. This changes
values such as caption, name, font,
colour, size and position.
The Visual
Basic Toolbar provides shortcuts for
commonly used operations.

Moving
and Resizing :
Any
object on a form and the form itself can
be moved and resized using the mouse. To
move a form, click on the title bar of
the form, hold down the left mouse button
and drag the form to its new position. To
resize a form, similary drag the bottom
right hand corner of the form using the
mouse. (You can also drag the right hand
side or bottom of the form for horizontal
or vertical resizing.)
To move an object on a form, click on the
object, hold down the left mouse button
and drag the object to its new position.
To resize, click on the object and drag
any of the "handles" (black
dots) with the mouse.
Task
One :
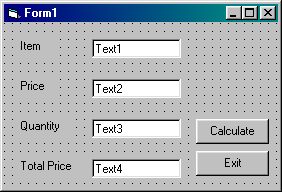
1. Open a
New Project (File Menu, New Project).
2. Click on the Label Icon in the
Toolbox. 
3. Move to the Form, hold down the left
mouse button, drag to the right and down
to produce a label box (see above).
4. Select the label.
5. Click on the Caption property (in the
Properties window) and change the caption
to 'Item'.
6. Repeat steps 2 to 4 to produce labels
for 'Price', 'Quantity' and 'Total
Price'.
7. Click on the Text Box icon in the
Toolbox. 
8. Move to the Form, hold down the left
mouse button, drag to the right and down
to produce a text box (see above).
9. Repeat steps 7 and 8 to produce three
other text boxes.
10. Click on the Command Button icon in
the Toolbox. 
11. Move to the Form, hold down the left
mouse button, drag to the right and down
to produce a command button (see above).
12. In the properties window, click on
the Caption property and change the
caption to Calculate.
13. Repeat steps 10 to 12 to produce a
command button with the caption 'Exit'.
14. Practice moving and resizing the form
and its controls to allow ease of editing
and to align the form and its controls.
15. Choose 'Start' from the 'Run' menu or
click on the Start Program shortcut on
the toolbar. 
16. Move around the form using the mouse,
TAB key and arrow keys. Type some
information into the text boxes.
17. Chose 'End' from the 'Run' menu or
click on the Stop Program shortcut on the
toolbar. 
18. Choose 'Save Project' form the File
menu. You will be asked to give a name
for the new form and the new project
you've created. Call them both STOCK
(STOCK.FRM and STOCK.VBP).
Congratiulations, you've written your
first Visual Basic programme!!! At the
moment, it contains no code, doesn't
actually do anything with the data
eneterd and the buttons don't work, but
we'll change that later
Excercise
One:
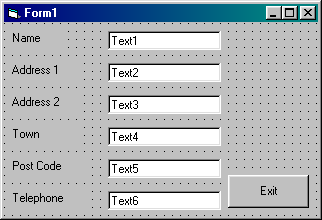
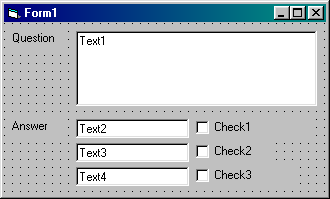
Open new
projects for each of the following forms,
create the objects shown and save with
the names given.
|
Form name:
|
ADDRESS.FRM
|
|
Project name:
|
ADDRESS.VBP
|
|
Form name:
|
QUIZ.FRM
|
|
Project name:
|
QUIZ.VBP
|
Page 1 2
3 4
5 6
[NEXT
>>]
Back to Tutorials
- Main
|