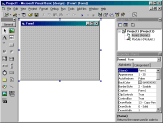
Click on the picture to see a larger version
The Basics:

Click on the picture to see a larger version
The above shows a typical opening screen for a
Visual Basic project. The screen above shows the toolbox, which is used to
design forms, a blank form, and the project details window. A Visual Basic
project consists of a number of forms, modules and custom controls. Your initial
screen may be different depending on which non-standard controls are loaded.
Forms are the main part of the project, used to design windows that serve as an
interface to your program. Forms are used to display such things as labels,
instructions, graphics and controls as well as allowing data entry for your
program.
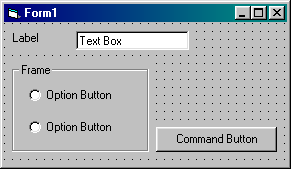
Controls are objects such as boxes, buttons, and labels that are drawn on a form
to get data input or to display output.
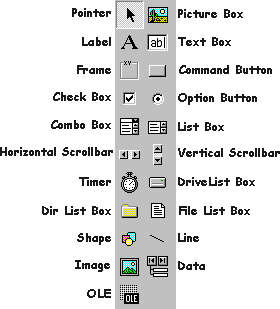
The Toolbox displays all the standard Visual Basic controls plus any custom controls you may have added to your project.
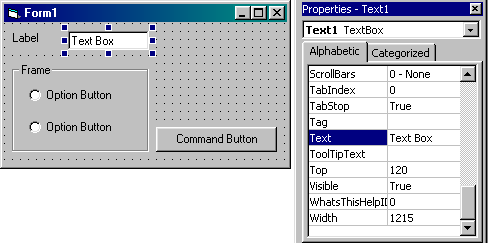
You set the properties of forms and controls using the properties window. This changes values such as caption, name, font, colour, size and position.
The Visual Basic Toolbar provides shortcuts for commonly used operations.

Moving and Resizing :
Any object on a form and the form itself can be
moved and resized using the mouse. To move a form, click on the title bar of the
form, hold down the left mouse button and drag the form to its new position. To
resize a form, similary drag the bottom right hand corner of the form using the
mouse. (You can also drag the right hand side or bottom of the form for
horizontal or vertical resizing.)
To move an object on a form, click on the object, hold down the left mouse
button and drag the object to its new position. To resize, click on the object
and drag any of the "handles" (black dots) with the mouse.
Task One :
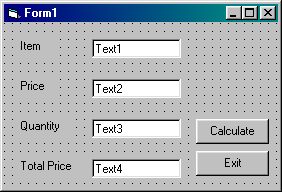
1. Open a New Project (File Menu, New Project).
2. Click on the Label Icon in the Toolbox. ![]()
3. Move to the Form, hold down the left mouse button, drag to the right and down
to produce a label box (see above).
4. Select the label.
5. Click on the Caption property (in the Properties window) and change the
caption to 'Item'.
6. Repeat steps 2 to 4 to produce labels for 'Price', 'Quantity' and 'Total
Price'.
7. Click on the Text Box icon in the Toolbox. ![]()
8. Move to the Form, hold down the left mouse button, drag to the right and down
to produce a text box (see above).
9. Repeat steps 7 and 8 to produce three other text boxes.
10. Click on the Command Button icon in the Toolbox. ![]()
11. Move to the Form, hold down the left mouse button, drag to the right and
down to produce a command button (see above).
12. In the properties window, click on the Caption property and change the
caption to Calculate.
13. Repeat steps 10 to 12 to produce a command button with the caption 'Exit'.
14. Practice moving and resizing the form and its controls to allow ease of
editing and to align the form and its controls.
15. Choose 'Start' from the 'Run' menu or click on the Start Program shortcut on
the toolbar. ![]()
16. Move around the form using the mouse, TAB key and arrow keys. Type some
information into the text boxes.
17. Chose 'End' from the 'Run' menu or click on the Stop Program shortcut on the
toolbar. ![]()
18. Choose 'Save Project' form the File menu. You will be asked to give a name
for the new form and the new project you've created. Call them both STOCK
(STOCK.FRM and STOCK.VBP).
Congratiulations, you've written your first Visual Basic programme!!! At the
moment, it contains no code, doesn't actually do anything with the data eneterd
and the buttons don't work, but we'll change that later
Excercise One:
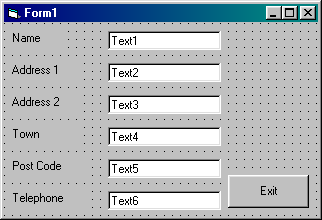
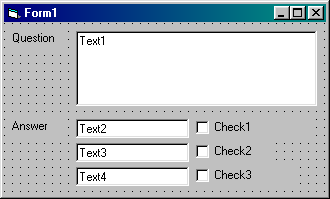
Open new projects for each of the following forms, create the objects shown and save with the names given.
|
Form name: |
ADDRESS.FRM |
|
Project name: |
ADDRESS.VBP |
|
Form name: |
QUIZ.FRM |
|
Project name: |
QUIZ.VBP |
Properties and Names:
We had a quick look at properties in Unit One
when we set up the Caption property for the labels and command buttons. An
important part of the design of a Visual Basic project is to ensure that the
forms displayed for the user are well labelled and provide straightforward and
validated data entry. For the programmer, the use of meaningful names for
controls makes coding easier to understand and debug. Trying to understand and
alter something like
If x1 > y1 Then
Text2 = "Too much"
Else
z2 = 2
End If
is almost impossible. What are x1, y1 and z2? What are we checking? Where is
Text2 situated?
Properties:
For forms, labels and command buttons, the Caption property should always be set. The caption is the text that appears on a label or command button or at the top of a form.
For text boxes, the value that you want to appear as the form is loaded should always be set. In Unit One, we didn't do this and the default values of Text1, Text2, Text3 and Text4 were displayed. This is unsatisfactory for this application - the user would need to delete this text before meaningful values could be entered. Normally, we don't want to anything to be displayedin data entry boxes and would therefore clear the Text property. Occasionally, we would set a default value, for example, setting a VAT box to 17.5%.
Names:
For controlsthat we need to refer to during
coding, the name property needs to be set. This enables us to write meaningful
programs that are easy to follow and easy to change. There are a number of
conventions used by programmers, but control names should always be descriptive
and, if naming controls in Visual Basic consists of a standard prefix to
describe the type of control, followed by whatever you want to call the object.
For example, in Unit One, we ended up with a form called Form1 (the Order Entry
form), a text box called Text1 (the Data Entry box for the Item Name) and a
command button called Command1. The following names would meet the standard
Visual Basic naming convention:
|
Control |
Control Prefix |
Object Name |
Complete Name |
|
Form1 |
frm |
Order |
frmOrder |
|
Text1 |
txt |
Item |
txtItem |
|
Command1 |
cmd |
Calculate |
cmdCalculate |
Task 2:

1. Open the project created in Exercise One
(File Menu, Open Project, stock.vbp)
2. Click somewhere on the form's background - not on any of the controls.
3. Click on the Caption property and change the caption to 'Order Entry'.
4. Click on the Name property and change the name to frmOrder
N.B. Note the difference between Caption and Name. The caption is a label for
the form to help the eventual user understand what this form does. We make this
descriptive and spaces are allowed. The Name is the name used by tou, the
programmer. It is still descriptive, but just enough to tell us the type of
object and an indication of its purpose. No spaces are allowed.
5. Click on the text box Text1. In the properties window, click on the name
property and change the name to txtItem. Click on the text property and delete
the text 'Text1'. Similarly delete the existing text and change the name
properties of Text2, Text3 and Text 4 to txtPrice, txtQuantity and txtTotalPrice
respectively.
6. Change the name proerties of the two command buttons to cmdCalculate and
cmdExit.
Click on the Save ![]() shortcut on the toolbar to save your changes (alternatively choose Save Project
from the File menu)
shortcut on the toolbar to save your changes (alternatively choose Save Project
from the File menu)
Exercise Two :
1. Open th Project ADDRESS.VBP and make the
following changes to its properties:
|
Default Name/Caption |
New Caption |
New Name |
Notes |
|
Form1 |
Address Entry |
|
|
|
Text1 |
|
txtName |
Delete existing text |
|
Text2 |
|
txtAddress1 |
Delete existing text |
|
Text3 |
|
txtAddress2 |
Delete existing text |
|
Text4 |
|
txtTown |
Delete existing text |
|
Text5 |
|
txtPostCode |
Delete existing text |
|
Text6 |
|
txtPhone |
Delete existing text |
|
Exit |
|
cmdExit |
|
|
Default Name/Caption |
New Caption |
New Name |
Notes |
|
Form1 |
Quiz |
frmQuiz |
|
|
Text1 |
|
txtQuestion |
Delete existing text |
|
Text2 |
|
txtAnswer1 |
Delete existing text |
|
Text3 |
|
txtAnswer2 |
Delete existing text |
|
Text4 |
|
txtAnswer3 |
Delete existing text |
|
Check1 |
|
chkAnswer1 |
Delete existing caption |
|
Check2 |
|
chkAnswer2 |
Delete existing caption |
|
Check3 |
|
chkAnswer3 |
Delete existing caption |
|
Exit |
|
cmdExit |
|
You've now finished setting up the properties
and names for the controls on our form and we're now able to make it do
something!!
We need to write code to instruct the Calculate command button to respond to a
mouse click. The program should then look at the values entered into the Price
and Quantity text boxes, multiply them together and put the answer in the Total
Price text box.
You will write an event procedure called cmd_Calculate_Click. The name of this
procedure consists of the object's name (cmdCalculate), the underscore character
(_) and the type of event (Click).
Don't worry if this sounds complicated. Visual Basic will automatically create
the procedure names for you!!
When is a Text box not a Text box?
All data entry in Visual Basic is treated as
text, even if numbers are entered. Unlike older versions of Basic, Visual Basic
will sometimes recognise that numbers have been entered and will allow them to
be used in calculations.
However, care needs to be taken when making assumptions about numbers entered
into text boxes. At a later stage, we will make sure the user isn't allowed to
enter letters by mistake in a text box that should contain a number, and that
numbers are treated correctly by Visual Basic.
Task Three :
1. Double click on the command button named "cmdCalculate" (caption "Calculate"). The procedure name and End Sub is automatically entered:
Sub cmdCalculate_Click()2. Complete the event procedure by entering the calculation for Total Price:
End Sub
Sub cmdCalculate_Click()This will take the value entered in the Price text box (txtPrice), multiply it (note the *) by the value entered in the Quantity text box (txtQuantity) and place the answer in the Total Price text box (txtTotalPrice).
txtTotalPrice = txtPrice * txtQuantity
End Sub
Sub cmdExit_Click()10. Run the program again using the Start Program shortcut, try various calculations and then click the Exit button to finish.
End
End Sub
Exercise Three :
1. Change the Caption of the Total Price label
to Sub Total. Change the name of txtTotalPrice to txtSubTotal.
2. Create a new label with the caption 'VAT'. Create a new text box withe the
name txtVAT and clear its text property.
3. Edit the cmdCaltulate_Click() event procedure to work out the sub total
(txtSubTotal=txtPrice*txtQuantity) and an extra line to calculate the VAT
(txtVAT=txtSubTotal * 17.5 / 100).
4. Create a new label and text box for 'Price Including VAT' and add an extra
line to the cmdCalculate_Click() procedure to calculate a value for this new
text box.
Save your work and run your program with various values.
Working with Text :
Text boxes, as the name implies, are designed
to work directly with text. All text 'strings' involved within a program have to
be enclosed within quotes.
For example, to assign the value "Radio" to the Item text box within
the Order Entry Form, we would use the following code:
txtItem = "Radio"Task Four :
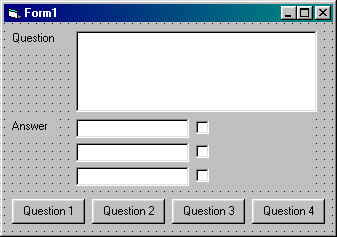
Sub cmdQ1_Click ()Click on the Start Program button, click on the command button to see the question being displayed. Click on the End Program button when you've finished.
txtQuestion = "What do you call a small piece of silicon which has a number of electronic circuits fabricated on it?"
txtAnswer1 = "Byte"
txtAnswer2 = "Chip"
txtAnswer3 = "Port"
End Sub
Exercise Four :
1. Enter code for the Question 2, Question 3, Question 4 command buttons using the following:
|
Question 2 |
A keyboard is used to |
|
Answers |
Output data |
|
Question 3 |
Which of the following is not an output device? |
|
Answers |
Light pen |
|
Question 4 |
The programs that run on a computer are known as |
|
Answers |
Hardware |
Making Decisions :
You can include decision structures in any event procedure. A decision structure will test a condition and then perform operations depending on whether or not the condition is met or not (True or Flase). A condition usually makes a comparison between two values using one of the following operators:
|
Operator |
Meaing |
Examples |
Explanation |
|
= |
Equal to |
txtItem ="Radio" |
is the item a Radio |
|
<> |
Not Equal to |
txtPrice <> 0 |
is the price not 0 |
|
> |
Greater than |
txtPrice > 12.54 |
is the price greater than 12.54 £ |
|
< |
Less than |
txtPrice < 10.00 |
is the price less than 10.00 £ |
Examples :
To set the Price to £12.54 if the item is a radio:
If txtItem = "Radio" ThenTo set the address details if the name is P Brown:
txtPrice = 12.54
End If
If txtName = "P Brown" ThenTo check if the user has chosen the correct check box for Question 1 in the quiz:
txtAddress1 = "East Birmingham College"
txtAddress2 = "Garretts Green Lane"
txtTown = "Birmingham"
txtPostCode = "B33 0TS"
txtPhone = "743 4471"
End If
If chkAnswer2 = True ThenN.B. Notice the use of indents to line up the main parts of the stucture. This is used extensively in Visual Basic to make the program easier to follow and to make checking for the start and end of a particular structure easier.
Score = 1
Else
Score = 0
End If
Task Five :
1. Open the project STOCK.VBP. Add another
command button with a caption of Find Item and a Name cmdFindItem.
2. Double click on this command button and add the following code:
Sub cmdFindItem_Click ()3. Click on the Start Program button, enter a valid Item e.g. Radio and click on the Find Item command button to see the price being displayed. Try the program with other valid items (Headphones, Glasses or Teddy Bear). What happens if you enter an item that is not in the list? What happens if you type radio instead of Radio? What happens when you click on the Calculate command button? (We'll come back to this shortly)
If txtItem = "Radio" Then
txtPrice = 12.54
End If
If txtItem = "Headphones" Then
txtPrice = 23.5
End If
If txtItem = "Glasses" Then
txtPrice = 13.99
End If
If txtItem = "Teddy Bear" Then
txtPrice = 23.49
End If
End Sub
Exercise Five :
1. Open the ADDRESS.VBP project and add a Find
Name command button (cmdFindName)
2. Add code for this button consisting of a number of If Then ... End If
statements to check for the following names and the appropriate details from the
table below:
|
Name |
Address 1 |
Address 2 |
Town |
Post Code |
Phone |
|
P Brown |
E. Birmingham Coll. |
Garretts Green Lane |
Birmingham |
B33 0TS |
743 4471 |
|
J. Jones |
1 New Street |
Solihull West |
Mids |
B92 6TY |
706 2234 |
|
B. Jaffer |
33 Green Lane |
Small Heath |
Birmingham |
B12 3ER |
356 3434 |
|
C. Henry |
243 Field Road |
Sheldon |
Birmingham |
B26 4ER |
742 2323 |
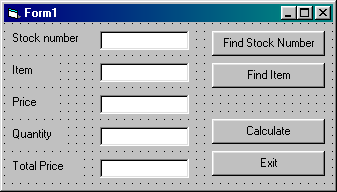
|
Text box name |
txtStockNumber |
|
Command button name |
cmdFindNumber |
|
Stock Number |
Item |
Price |
|
1000 |
Radio |
12.54 |
|
1001 |
Headphones |
23.50 |
|
1002 |
Glasses |
13.99 |
|
1003 |
Teddy Bear |
23.49 |
|
1004 |
Rocking Horse |
45.98 |
|
1005 |
Dinner Set |
24.99 |
More Decisions :
The Select Case Structure
Quite often, as in the last unit, we need
to test the same item a number of times for different values. When this is the
case, we can replace all of the If ... Then ... Else statements that check that
particular item with a Select Case structure. The general format is
Select case ITEMNAME
Case First Possibility
Statements
Case Second Possibility
Statements
...
Case Final Posibility
Statements
Case Else
Statements
End Select
Each possible value of the item is checked
using a Case statement and is followed by one or more Basic statements that will
be carried out if there is a match for that value.
The final part of the structure is usually a Case Else statement which will come
into operation if none of the other values match. This is useful for informing
the user that he/she has made an error.
The Message Box
One Quick and easy way of displaying messages
for the user is the message box. This brings up a standard Windows Dialogue Box,
with appropriate buttons for the user to choose from. A message box is called
from Visual Basic code using the MsgBox function using the following format:
MsgBox (message, type, title)
where message = text to be sdisplayed, type = buttons to be displayed, title =
title that appears at the top of the box. The type and title sections are not
compulsory - if thay are omitted, you will get a Dialogue Box with just an OK
button and the title of the Form as the title of the Dialogue Box.
Task Six :
1. Open the project STOCK.VBP. Double click on
the Find Item command button to bring back the previous code produces in Task
Five.
2. Delete or edit the existing code to replace the If ... Then ... End If
structures with the following Select Case structure:
Select Case txtItem
Case "Radio"
txtPrice = 12.54
Case "Headphones"
txtPrice = 23.5
Case "Glasses"
txtPrice = 13.99
Case "Teddy Bear"
txtPrice = 23.49
Case Else
Msgbox ("Your item has not been
found")
End Select
3. Start the program and try various correct and incorrect values for the item to check that your code is correct.
Exercise Six :
1. Modify the code for the Find Stock Number
command button within the Stock project to use a Select Case structure instead
of If ... Then ... Else statements.
2. Open the ADDRESS.VBP project and use the Select Case structure for the Find
Name command button.
3. Add a new button to the Address project called cmdFindTelephone, with a
Caption of Find Telephone Number. Write code code for this command button using
the Select Case structure that will check a telephone number that is entered and
automatically fill in the name & address details.
Using Else with an If statement
We saw in the previous tasks, the use of Else with the Select Case structure.
The Else statement within an If ... Then ... End If structure performs a similar
operation. This time, instead of checking a number of possibilities, we only
check one condition and the Else statement comes in operation immediately if
this condition is not met. The general format is:
If condtion statement(s) Then
statement(s)
Else
statement(s)
End If
For example, in the Stock project, we might want to check that a quantity is entered before carrying out calculations:
If Val(txtQuantity) = 0 Then
MsgBox ("You have not entered a quantity")
Else
txtSubTotal = Val(txtPrice) * Val(txtQuantity)
... other calculations ...
End If
N.B. val(txtQuantity) will also give a value of 0 if text is accidentally entered into the quantity box. The above code will therefore check for a zero quantity or text incorrectly entered.
Exercise Seven:
1. Open the Stock project and amend the code
for the Calculate command button to check that a valid quantity has been entered
as described above.
2. Amend the code for the Find Stock Number command button to ensure that text
is not entered for the Stock Number. Remember that val(StockNumber) will give
zero if text is entered. Also, in this case, the Select Case structure should be
completely contained within the If ... Else ... End if structure:
If .......... Then
........
Else
Select Case
........
........
........
End Select
End If
Indentation :
Hopefully, you will have noticed that indentation is widely used in Visual Basic coding. Indentation is used to show the various parts of a structure - the statements that make up the structure are lined up. For example:
If ..... Then
statement(s)
Else
statement(s)
End If
Notice how the three components of the structure - If, Else and End If - are lined up and the statements that are linked to each part of the structure are indented. Similary, with the Select Case:
Select Case ...
Case ...
statement(s)
Case ...
statement(s)
Case ...
statement(s)
Case ...
statement(s)
End Select
More indentation is needed for structures within structures:
Select Case ...
Case ...
If ... Then
statement(s)
Else
statement(s)
End If
Case ...
statement(s)
End Select
The use of indentation makes coding much easier to read and change, particularly when the code becomes more and more complex with the extended use of various types of structure. It is very difficult, without the use of indentation, for instance to match End Ifs, End Selects, etc. to the appropriate opening statements, and this type of mismatch is a very common programming fault.
Comments :
It's easy to remember what a particular piece
of simple code does immediately after you have written it. But what happens with
very complex code that you wrotesix months ago that you have to change for some
reason? Quite often, programmers write code and they can't remember what its
purpose was. Similarly, they know why and what they've written, but can't find
it!!
The use of comments within programs helps the original programmer and, more
importantly, other people who have to read and/or amend the code, understand
what particular sections of code do.
Remarks are used troughout the code as explanatory notes for the programmer.
Thay do not effect the running of the code in any way. Each line of comments
needs to start with Rem statement or a singe apostrophe ( ' ). For example:
Rem The following code checks the item entered into the Stock form
Rem and enters the appropriate price into the form
Select Case txtItem
Case "Radio"
txtPrice = 12.54
Case "Headphones"
txtPrice = 23.5
Case "Glasses"
txtPrice = 13.99
Case "Teddy Bear"
txtPrice = 23.49
'if the item is not found, display appropriate dialogue box
'with OK button only
Case Else
MsgBox ("Your item has not been
found")
End Select
Exercise Eight :
Re-visit all the code you have written so far. Check that indentation is used where appropriate and add comments throughout to describe your code.
Sharing Data :
All the data we have used so far has been
conveniently contained within controls on a form. This has meant that we can use
the name of the control (txtQuantity, txtPrice, txtTotal, etc.) to refer to the
data that is contained within those controls.
There are often times when we need to use variables data that is not contained
in a control. Typical examples would be - to move data from one control to
another, to move data from one form to another, as a temporary store during
calculations and holding information for decision making.
To allow data to be shared between controls within a for, we declare the name of
the data (and usually its data type) in the General Declarations section of the
form's code. The general format of the declaration is
Dim data name as data type
For example:
|
Dim OldPrice As Integer |
defines a new variable (data that can be changed troughout the program) called OldPrice that can only hold integer (whole number) values. |
|
Dim Student As String |
defines a new variable called Student that will hold text strings. |
Check Boxes :
Check Boxes only have two values 0 or 1, depending wether they are unchecked or checked. We can clear a check box by setting a-its value to 0 (e.g. chkAnswer1 = 0). We can also examine whether or not a check box has been checked or not. For Example:
If chkAnswer1 = 1 Then
MsgBox ("Correct answer")
Else
MsgBox("Wrong answer")
End If
Task Nine :
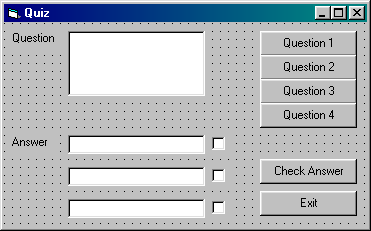
1. Open the Quiz project, re-arrange and add
controls so that it is similar to the above.
2. Double click anywhere on the form, avoiding the form's controls to bring up
the form's code. Choose (general) from the Object list at the top of the form's
code and (declarations) from the Proc list. Enter:
Dim QuestionNumber As Integer

3. As each question is chosen, we need to ensure that the check boxes are cleared and that the QuestionNumber variable is set to the correct value. Edit the code for the Question 1 command button as follows:
chkAnswer1 = 0
chkAnswer2 = 0
chkAnswer3 = 0
QuestionNumber = 1
txtQuestion = "What do you call a small pice of silicon which has a number
of electronic circuits fabricated on it?"
txtAnswer1 = "byte"
txtAnswer2 = "chip"
txtAnswer3 = "port"
4. Edit the code for the Question 2, Question 3
and Question 4 command buttons similarly.
5. We need to write the code for the Check Answer command button. Generally, the
message given to the user depends on the Question Number and which Check Box has
been chosen. We can use a select Case structure for the question number and an
If ... Else ... End If structure for checking the answer given. For question
numbers 1 and 2 (Case 1, 2) the second answer (chkAnswer2) is correct, for
Question 3 (Case 3) the first answer is correct (chkAnswer1) and for question 4
(Case 4) the third answer is correct (chkAnswer3). Doube click on the Check
Answer command button and enter the following code
Select Case QuestionNumber
Case 1,2
If chkAnswer2 = 1 Then
MsgBox ("Well done,
that is correct")
Else
MsgBox ("I'm afraid
that is the wrong answer")
End If
6. Enter the code for Case 3 and Case 4, the
End Select statement and statements to clear the check boxes after the Select
Case structure.
7. Save the project, start the program and test all options to see if your code
works.
Exercise Nine :
1. Open the Stock project and add two check
boxes labeled VAT and no VAT.
2. Edit the coding of the Calculate command button to see whether or not VAT is
payable and carry out the appropriate calculation.
3. Open the Address project and add two check boxes labeled First Name and
Surname.
4. Edit the coding for the Find Name command button to make it look for the
first or last name of the person entered, dependent on the check boxes, and
enter the relevant details. (Make up some first names of your own).
String Functions :
A string is a set of characters treated as a single object. A string can inlude letters, numbers and special characters such as -,£,&,*,etc. The following are typical types of string:
|
A name |
Freda Bloggs |
|
A telephone number |
0121-743-4471 |
|
A date |
16-1-99 |
|
A time |
22:05 |
|
A number |
345 |
|
Anything you like |
45$£%&ER(787***) |
LCase or UCase :
The LCase statement will turn an entire string into lower case, UCase turns a string into upper case. For example:
|
txtItem |
LCase(txtItem) |
UCase(txtItem) |
|
Radio |
radio |
RADIO |
|
Disk 3.5 |
disk 3.5 |
DISK 3.5 |
Sub cmdFindItem_Click()
If UCase(txtItem) = "RADIO" Then
txtPrice = 12.54
End If
End Sub
Left or Right :
The Left and Right functions are used to look at a set number of characters at the beginning or end of a string. The format is Left(String, Number of characters). For example:
|
txtItem |
Left(txtItem, 5) |
Right(txtItem, 3) |
|
Radio Set |
Radio |
Set |
|
Visual Basic |
Visua |
sic |
The Mid function return a certain number of characters from inside a string. The format is Mid(String, Starting Point, Number of Characters). For example:
|
txtItem |
Mid(txtItem, 4, 5) |
Mid(txtItem, 8, 1) |
|
Radio Set |
io Se |
e |
|
Visual Basic |
ual B |
B |
The Instr function tests to see whether on string occurs within another string. If the string occurs, the position of the start of the string is returned, otherwise 0 is returned. A start point for the search can be included, but is not compulsory. The format is InStr(Start Point, Large string, Small String). For example:
|
txtItem |
Instr(1, txtItem, "Brown") |
Instr(1, txtItem, "Smith") |
|
Paul Brown |
6 |
0 |
If Instr(txtName, "Brown") > 0
Then
txtAddress1 = .........
...
...
...
End If
Mixing String Functions :
Quite often we mix string functions to ensure thorough checking. For example, we might need to force upper case for checking purposes and only look at a certain number of characters. Here are some examples:
If Right(UCase(txtItem), 5) =
"RADIO" Then ...
If InStr(1, UCase(txtName), "BROWN") > 0 Then ...
Format :
The format function is used to change the format of string, particularly those containing values. The general format is Format(String, format string). The format string is a set of characters that define how the string will be displayed. Typical format characters are
|
0 |
Display a digit ar a zero |
|
# |
Display a digit or nothing (if zero) |
|
% |
Multiply by 100 and add the % character |
|
£ |
Insert a £ character |
|
-() space |
Display -,(,) or a space |
|
String |
Format String |
Result |
|
23.4567 |
"0000.00" |
0023.46 |
|
23.4567 |
"####.##" |
23.46 |
|
23.4567 |
"£0000.00" |
£0023.46 |
|
23.4567 |
"£####.##" |
£23.46 |
|
01217434471 |
(0000) 000 0000 |
(0121) 743 4471 |
For all of the following, test that your code
works before continuing.
1. Open the Stock project
2. Edit the coding of the Find Item command button and use the Ucase or LCase
function to ensure correct matching.
3. Add the left function to only check the amount of characters that should have
been entered i.e. for "Radio", check Left(txtItem, 5).
4. Add an extra button that will allow the user to search for part of a string
(e.g. "Set" within "Dinner Set"). Copy the code from th Find
Item button and paste into the code for the new button. Amend the code to use
the InStr function.
5. Edit the code for the Calculate button to make use of the Format function to
display the Sub Total, VAT and Total Price as currency.
6. Open the Address project.
7. Amend the code for the Find Name button to make use of the InStr function to
find either the first name or last name.
8. Use the format function to display the
telephone number as follows:
0121-7434471
9. Amend the code for the Find Telephone button to allow for the fact that the
user may enter the number without the area code. (InStr or Right could be used).
10. The Len function ( Len(string) ) returns the number of characters in a
string. Assume that a telephone number cannot have more than 12 characters. Add
a test to the Find Telephone code to check that the user's number is not too
big.
11. Find out about the Now function and Date formats from th help menu. Add a
text box to all your forms that displays today's date in a suitable format.