VbdirectX
FAQ
VbdirectX
FAQ
Author: Arthur
Le Vernoy
Direct Draw
Overview
DirectDraw is a component of the
DirectX drivers. It allows you to
directly access the display memory while
maintaining full compatibility with the
Standard graphics API in the Windows
environment (GDI). DirectDraw allows you
to perform advanced graphics tasks, such
as blitting or accessing transparency
capabilities, without hardware
dependency.
This FAQ, will explain how to access
DirectDraw with Visual Basic and will
consist of the following articles;
1. Direct Draw Basics (Tutorial)
2. ModeX
3. 8 Bit Mode (Palettes and Stuff...)
4. 16 Bit Mode
5. Transparency
6. Overlays
7. Playing an AVI file (testing ground
for Overlays)
8. Algorithms
9. Questions and Answers
10. Credits & Acknowledgements
Direct
Draw Basics
DirectX through Visual Basic
To access DirectX through Visual
Basic, you’ll need a typelib file
describing all the DirectX API or a third
party ActiveX control. You can find a
free (*.tlb) file at the Visual
Basic Area 51 site courtesy of
Patrice Scribe. Please read the FAQ,
disclaimer and other information on his
page to know more about what you can do
with this file. Don’t worry, you
won’t have to pay for it!
It is also suggested that you download
the win32.tlb file, this file will give
you access to the Win32 API without
having to copy/paste declarations from
the API Viewer.
When you downloaded those files, you
must add a reference to them in your
Visual Basic project. See
Project|References menu in the Visual
Basic IDE.
Basic
Concepts
Surfaces
|
A surface, or
DirectDrawSurface object,
represents a linear area of
display memory. A surface usually
resides in the display memory of
the display card, although
surfaces can exist in system
memory. Unless specifically
instructed otherwise, during the
creation of the DirectDrawSurface
object, the DirectDraw object
will put the DirectDrawSurface
object wherever the best
performance can be achieved given
the requested capabilities.
DirectDrawSurface objects can
take advantage of specialized
processors on display cards, not
only to perform certain tasks
faster, but to perform some tasks
in parallel with the system CPU.[Taken from DirectX 5
SDK Help file]
|
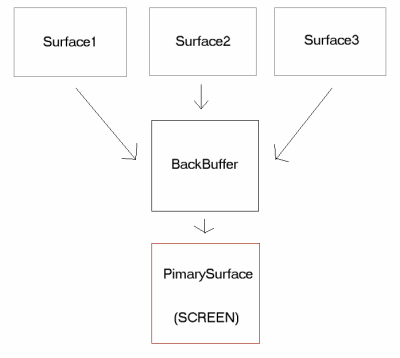
One way to create fast graphics
drawing is to draw directly on the
screen. Imagine now that one of your
end-users is trying to run your project
under a 286 Computer, your application
might not be able to draw graphics on the
screen at a decent rate. To avoid this,
we’ll draw the entire scene on a
‘BackBuffer’ (Basically an
invisible Surface), and then draw this
BackBuffer on to the screen. This is
called BackBuffering.
Initializing
Directdraw
To use DirectDraw, you first create an
instance of the DirectDraw Object,
which represents the display adapter on
the computer. You then use the interface
methods to manipulate the object. In
addition, you need to create one or more
instances of a DirectDrawSurface
object to be able to display your
application on a graphics surface.
To create an instance of the
DirectDraw Object, your project must call
the DirectDrawCreate
function. This function contains three
parameters. The first parameter takes a
globally unique identifier (GUID)
that represents the display device. The
GUID, in most cases, is set to Byval
0&, which means DirectDraw
uses the default display driver for the
system. This also means that you
won’t have to deal with hardware
stuff. The second parameter is the
DirectDraw object itself.
[See source code at the end of this
section]
Next, you’ll have to determine
the application behavior you want. Is the
app going to be fullscreen or windowed?
Is it going to use exclusive mode?
Exclusive Mode
This mode won’t let other apps
(or yours…) set a DirectDraw Object
to the same mode. This mode significantly
increases DirectDraw's performance. I
suggest you use this mode always with DDSCL_FULLSCREEN
flag.
To do this, you’ll have to call
the SetCooperativeLevel method:
DirectDraw.SetCooperativeLevel(hWnd as
hWnd, dwFlags as long)
HWnd is the handle of the Form where
DirectDraw will perform.
DwFlags are parameters seperated by
the OR operator:
DDSCL_ALLOWMODEX
Allows the use of Mode X display
modes. This flag must be used with the
DDSCL_EXCLUSIVE and DDSCL_FULLSCREEN
flags.
DDSCL_ALLOWREBOOT
Allows CTRL+ALT+DEL to function while
in exclusive (full-screen) mode.
DDSCL_EXCLUSIVE
Requests the exclusive level. This
flag must be used with the
DDSCL_FULLSCREEN flag.
DDSCL_FULLSCREEN
Indicates that the exclusive-mode
owner will be responsible for the entire
primary surface. GDI can be ignored. This
flag must be used with the
DDSCL_EXCLUSIVE flag.
DDSCL_NORMAL
Indicates that the application will
function as a regular Windows
application. This flag cannot be used
with the DDSCL_ALLOWMODEX,
DDSCL_EXCLUSIVE, or DDSCL_FULLSCREEN
flags.
DDSCL_NOWINDOWCHANGES
Indicates that DirectDraw is not
allowed to minimize or restore the
application window on activation.
i.e:
Ddraw.SetCooperativeLevel Me.Hwnd,
DDSCL_FULLSCREEN or DDSCL_EXCLUSVE
(This might be the best way for
DirectDraw to achieve good performance.)
[See source code at the end of this
section]
Next, you can change the Display Mode
to fit your application aims using the
SetDisplayMode method.
SetDisplayMode(dwWidth,dwHeight,dwBPP,dwRefreshRate,dwFlags)
(All parameters are long values)
dwWidth: X resolution
dwHeight: Y resolution
dwBPP: BitsPerPixels (8= up to 256
colors; 16= up to 65536 colors..)
dwRefreshRate: Set to 0; forget it.
DwFlags: the only flag availlable is
DDSDM_STANDARDVGAMODE, which lets you
switch from ModeX to Mode13, we’ll
see that later.
[See source code at the end of this
section]
ModeX &
Mode13:
|
DirectDraw supports both Mode
13 and Mode X display modes. Mode
13 is the linear unflippable
320x200 8 bits per pixel
palettized mode known widely by
its hexadecimal BIOS mode number:
13. For more information, see
Mode 13 Support. Mode X is a
hybrid display mode derived from
the standard VGA Mode 13. This
mode allows the use of up to 256
kilobytes (KB) of display memory
(rather than the 64 KB allowed by
Mode 13) by using the VGA display
adapter's EGA multiple video
plane system.
On Windows 95,
DirectDraw provides two Mode X
modes (320�200�8 and
320�240�8) for all display
cards. Some cards also support
linear low-resolution modes. In
linear low-resolution modes, the
primary surface can be locked and
directly accessed. This is not
possible in Mode X modes.[Taken from DirectX 5
SDK HelpFile]
|
‘ ------- BEGIN CODE -------
Do
‘ Step
1: Clear the BackBuffer
‘ Step
2: Render all surfaces (bitmaps, sprites,
whatever…)
‘ Step
3: Render BackBuffer on Primary Surface =
FLIP
DoEvents
Loop
‘ ------- END CODE -------
The BackBuffer is ‘attached’
to the Primary Surface, which means it
will have the same behavior. To create
the Primary Surface, your application
will have to call the CreateSurface
function of the DirectDraw Object.
CAUTION: Do not forget this, trying to
create a surface to hold a bitmap for
instance, before creating the DirectDraw
Object, is a very common newbie mistake.
DDraw.CreateSurface(ddsd as
DDSURFACEDESC, DDS as
IDirectDrawSurface3, IUnknown as Long)
Ddsd: DirectDraw Surface Description
(See code below)
DDS: Surface Object
IUnknow: Always set to ‘Byval
0&’ (For future DDraw
enhancement)
To attach the BackBuffer to the
Primary Surface use the following method:
PrimarySurface.GetAttachedSurface(ddc
as DDSCAPS, BackBuffer)
Well, you learned quite a lot of
theoretical stuff, now it’s time to
jump right in with some practice.
Here’s the code:
' ------- BEGIN CODE -------
'--------------
' DECLARATIONS:
'--------------
Public DDraw
as IDirectDraw2
Public
PrimarySurface as IDirectDrawSurface3
Public
BackBuffer as IDirectDrawSurface3
'
-------------------------------------------
' Paste this code in the Load Event of
a Form
'
-------------------------------------------
Dim ddsd As
DDSURFACEDESC, ddc As DDSCAPS
If DDraw Is
Nothing Then
DirectDrawCreate
ByVal 0&, DDraw, Nothing
End If
Set
BackBuffer = Nothing
Set
PrimarySurface = Nothing
' This will
set your window border to 0.none (need
Win32.tlb)
Win32.SetWindowLong
Me.hWnd, Win32.GWL_STYLE, Win32.WS_POPUP
Or Win32.WS_VISIBLE
Win32.SetWindowPos
Me.hWnd, Win32.HWND_TOPMOST, 0, 0, 0, 0,
Win32.SWP_NOMOVE Or Win32.SWP_NOSIZE
' Set DDraw
Behaviour
DDraw.SetCooperativeLevel
Me.hWnd, DDSCL_EXCLUSIVE Or
DDSCL_FULLSCREEN
' Change
display Mode
DDrawObj.SetDisplayMode
ResX, ResY, BPP, 0, 0
' DirectDraw
Surface Description
With ddsd
.dwSize =
Len(ddsd) ' Do never forget this line!
.dwFlags =
DDSD_CAPS Or DDSD_BACKBUFFERCOUNT
.dwBackBufferCount
= 1 ' You can try with 2 or 3
.DDSCAPS.dwCaps
= DDSCAPS_PRIMARYSURFACE Or DDSCAPS_FLIP
Or DDSCAPS_COMPLEX Or
DDSCAPS_SYSTEMMEMORY
End With
' Creates the
Primary Surface with ddsd description
DDraw.CreateSurface
ddsd, PrimarySurface, Nothing
' Attaches
the BackBuffer to the Primary surface
ddc.dwCaps =
DDSCAPS_BACKBUFFER
PrimarySurface.GetAttachedSurface
ddc, BackBuffer
' ------- END CODE -------
Load a bitmap
on a surface
You might want to load a bitmap file
on a surface to be displayed through
DirectDraw. We’ll create two
reusable functions:
1. CreateSimpleSurface
2. CreateSurfaceFromBitmap
Why? Well, one of these days you might
also want to create a surface and write
directly to it, without loading any file
on it. So we’re going to call CreateSimpleSurface
in the CreateSurfaceFromBitmap
code.
' ------- BEGIN CODE -------
Function
CreateSimpleSurface(DDrawObj as
IDirectDraw2, nWidth As Long, nHeight As
Long) As IDirectDrawSurface3
If nWidth
<= 0 Then Exit Function
If nHeight
<= 0 Then Exit Function
Dim ddsd As
DDSURFACEDESC
Dim dds As
IDirectDrawSurface3
With ddsd
.dwSize =
Len(ddsd)
.dwFlags =
DDSD_CAPS Or DDSD_HEIGHT Or DDSD_WIDTH
.DDSCAPS.dwCaps
= DDSCAPS_OFFSCREENPLAIN Or
DDSCAPS_SYSTEMMEMORY
.dwWidth =
nWidth
.dwHeight =
nHeight
End With
DDrawObj.CreateSurface
ddsd, dds, Nothing
Set
CreateSimpleSurface = dds
Set dds =
Nothing
End Function
' ------- END CODE -------
As you can see, it’s using
basically the same code as for creating
the Primary Surface. However, the ddsd
description of the surface is quite
different. We won’t explain it for
the moment, because it’s quite
useless now. You will note the presence
of the DDSCAPS_SYSTEMMEMORY
flag in the ddsd.DDSCAPS.dwCaps
property. This flag will tell DirectDraw
that you’re emulating Video RAM
(VRAM) into the RAM. It’s slower but
solves a lot of problems. The best way to
optimize DirectDraw performance is to try
to create a surface using VRAM. To do
that simply change the flag
DDSCAPS_SYSTEMMEMORY by
DDSCAPS_VIDEOMEMORY. If the CreateSurface
method sends Visual Basic an Error called
DDERR_OUTOFMEMORY (referenced in
directx.tlb) then use RAM instead.
Now, let’s deal with the CreateSurfaceFromBitmap
Function. As mentioned above, this
function will call the
CreateSimpleSurface described above to
create the DirectDraw surface. This
function will be able to load BMP, GIF
and JPEG files.
' ------- BEGIN CODE -------
Function
CreateSurfaceFromBitmap(Filename as
String) as IDirectDrawSurface3
' Does
Filename exists?
If
dir$(Filename) = "" then exit
function
' Is it
really a BMP, JPEG or GIF file
Dim hFile as
Long, TmpByte as Byte
hFile =
FreeFile
Open Filename
for Binary as hFile
Get hFile, 1,
TmpByte
If TmpByte =
66 or TmpByte = 71 Or TmpByte = 255 Then
Else
Exit Function
End If
Close hFile
Dim frm As
Form, PictureWidth As Long, PictureHeight
As Long, Picture As StdPicture,
hdcPicture As Long, hdcSurface As Long,
DDS as IDirectDrawSurface3
' Load The
File
Set frm =
Screen.ActiveForm
Set Picture =
LoadPicture(Filename)
PictureWidth
= frm.ScaleX(Picture.Width, vbHimetric,
vbPixels)
PictureHeight
= frm.ScaleY(Picture.Height, vbHimetric,
vbPixels)
' Create the
Surface
Set DDS =
CreateSimpleSurface(PictureWidth,
PictureHeight)
hdcPicture =
Win32.CreateCompatibleDC(ByVal 0&)
Win32.SelectObject
hdcPicture, Picture.Handle
DDS.Restore
DDS.GetDC
hdcSurface
Win32.StretchBlt
hdcSurface, 0, 0, PictureWidth,
PictureHeight, hdcPicture, 0, 0,
PictureWidth, PictureHeight, SRCCOPY
DDS.ReleaseDC
hdcSurface
Win32.DeleteDC
hdcPicture
Set
CreateSurfaceFromBitmap = DDS
End Function
' ------- END CODE -------
Remember the Rendering loop?
To clear the BackBuffer(Or any other
Surface), you’ll have to perform a
blit on this surface
' ------- BEGIN CODE -------
Sub
Clear(Surface as IDirectDrawSurface3,
Color as Long)
Dim FX As
DDBLTFX
With FX
.dwSize =
Len(fx)
.dwFillColor
= Color
End With
' Fill the
Whole Surface with the same Color
BackBuffer.Blt
ByVal 0&, Nothing, ByVal 0&,
DDBLT_COLORFILL, FX
End Sub
' ------- END CODE -------
To clear the backBuffer use this line
of code:
' ------- BEGIN CODE -------
Clear
BackBuffer, 0
' ------- END CODE -------
For those how don’t know what a
RECT is, Here’s the explaination:
A RECT is a user-type used to
store a Rectangle position:
Public Type RECT
Left as Integer
Right as Integer
Top as Integer
Bottom as Integer
End Type
The Following Step in the rendering
loop is Blitting Capabilities, that is to
say, to be able to draw those surfaces
previously created on the BackBuffer.
This can be done using the Blt method of
the BackBuffer.
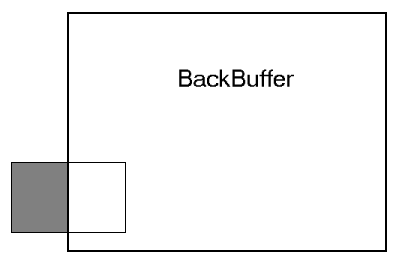
Please note that if you’re trying
to blit outside the Surface RECT (Outside
The screen’s edges), DirectDraw
won’t display anything. The
following piece of code, will fix this
problem by manipulating the Destination
& Source RECTS.
I won’t explain this, it’s
just logic and doesn’t have anything
to do with DirectDraw in it-self.
The Surface won’t be displayed if
you’re not using the code below.
' ------- BEGIN CODE -------
Sub
Draw(BackBuffer as IDirectDrawSurface3,
BackBufferWidth as Long, _
BackBufferHeight
as Long, Surface as IDirectDrawSurface3,
PosX as Long, _
PosY as Long,
nWidth as Long, nHeight as Long)
Dim SrcRect
As RECT, DestRect As RECT, fx As DDBLTFX,
BltFlag As Long
' Update
RECTS
' Standard
Way...
With SrcRect
.Left = 0
.Right =
nWidth
.Top = 0
.Bottom =
nHeight
End With
With DestRect
.Left = PosX
.Top = PosY
.Right =
.Left + nWidth
.Bottom =
.Top + nHeight
End With
' Check
Boundaries
If PosX <
0 Then
DestRect.Left
= 0
SrcRect.Left
= - PosX
End If
If PosY <
0 Then
DestRect.Top
= 0
SrcRect.Top =
- PosY
End If
If
DestRect.Right > BackBufferWidth Then
SrcRect.Right
= SrcRect.Right - (DestRect.Right -
BackBufferWidth)
DestRect.Right
= BackBufferWidth
End If
If
DestRect.Bottom > BackBufferHeight
Then
SrcRect.Bottom
= SrcRect.Bottom - (DestRect.Bottom -
BackBufferHeight)
DestRect.Bottom
= BackBufferHeight
End If
' BLIT
With FX
.dwSize =
Len(FX)
.dwROP =
Win32.SRCCOPY
End With
BackBuffer.Blt
DestRect, Surface, SrcRect, DDBLT_WAIT Or
DDBLT_ROP, FX
End Sub
' ------- END CODE -------
In this piece of code, transparency is
not supported. See Transparency chapter
for more information.
The Last part of the rendering loop is
to Blit the BackBuffer on the Primary
Surface.
' ------- BEGIN CODE -------
Sub Flip
Dim dds As
IDirectDrawSurface3
Set dds =
PrimarySurface
dds.Flip
Nothing, DDFLIP_WAIT
Set dds =
Nothing
If Err.Number
= DDERR_SURFACELOST Or Err.Number =
DDERR_SURFACELOST - &H100000 Then
BackBuffer.Restore
PrimarySurface.Restore
End If
Err.Clear
End Sub
' ------- END CODE -------
And Last but not least: You must
destroy any Surfaces or DirectDraw
Objects created by setting them to
Nothing, Ortherwise your application will
crash.
On the KeyPress Event of the Form
paste the following code:
' ------- BEGIN CODE -------
If KeyAscii =
27 then ' IF ESC KEY IS PRESSED
Unload Me
End if
' ------- END CODE -------
Then, in The Unload Event of your
Form:
' ------- BEGIN CODE -------
DDraw.FlipToGDISurface
' Restore
Display Mode
DDraw.RestoreDisplayMode
' Restore
Thread to Windows
DDraw.SetCooperativeLevel
0, DDSCL_NORMAL
' Destroy
Surfaces
Set
BackBuffer = Nothing
Set
PrimarySurface = Nothing
Set DDraw =
Nothing
' CAUTION:
' If you have
any other surfaces created with
CreateSimpleSurface
' or
CreateSurfaceFromBitmap then type this
line of code:
'
' Set Surface
= Nothing
'
' where
Surface is the DirectDraw Surface Object
you want to destroy
' ------- END CODE -------
Well, that’s the end of this
tutorial folks. If you can do this (and
if you understand it), you’ll know
enough of the DirectDraw features to do a
good job. Try to type all of this sample
code without the help of this file,
that’s the only way to learn it.
Don’t forget that DirectX is a
Low-level API -it won’t forgive any
mistakes!
Note: All this coding material has
been tested, and should work quite well.
It’s not really optimized, but
should be much faster than GDI.
Back
to Tutorials - Main
|